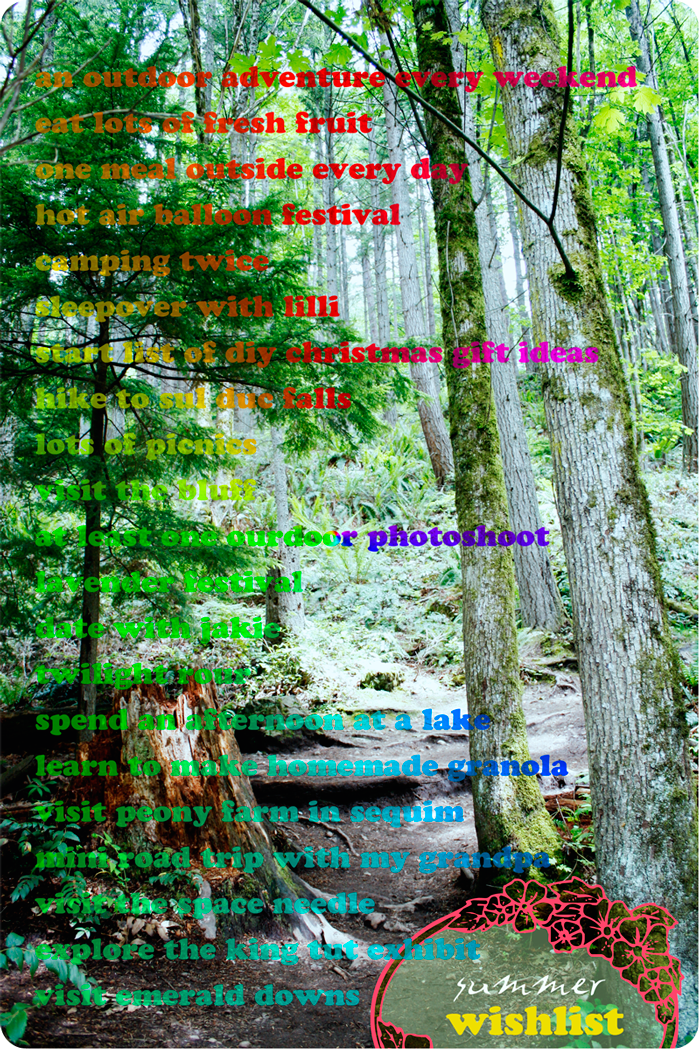
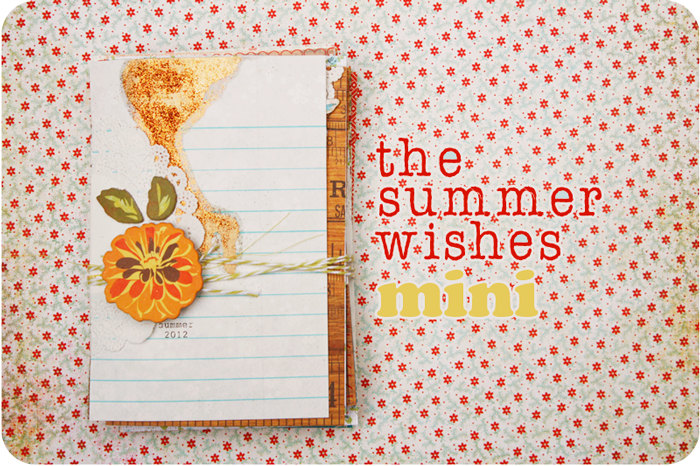
Friday, June 29, 2012

{weekend adventure} pike place market

{public} market center
I recently was able to spend a lovely afternoon explorng Pike Place Market with Ryan, my mom and sister, Amber. We walked through the market, gazing at all the beautiful bouquets, stopping to sample fruit and watch fish be thrown across the room. I picked up some cimmanon apple chips, spices, and a big bouquet to brighten up our home. All the old brick buildings surrounding the market had so much charm, we strolled around, walking down Post Alley, tasting freshly made cheese and ended up taking a break at Seattle's Best Coffee for a refreshing espresso! I especially loved our stops to listen to musicains as they sang, played the banjo and made pretty music fill the air. The energy was electic.  <3 Carrie

so many to choose from {fresh} flowers {taking} this one home {happy} {parking} look up {covered} parking {seattles} best coffee {exploring} pike place market {amazing} colors all around {building} on the water {growing} on the cement {post alley} and such {big} bouquets

Thursday, June 28, 2012

{summertime treat} homemade peach ice cream

{homemade} peach ice cream
Fresh fruit is one of my favorite foods during the summer.  It seem to fit in perfectly with the fresh and sweet feeling that summertime brings. 

The other day I told Ryan I was going to make some homemade ice cream and asked if he had a preference as to the flavor.  He suggested peach.  Personally I thought is sounded a little gross (I don't like chunks of frozen fruit in my ice cream), but decided to be adventurous and give it a try.  I modified THIS recipe late that night while watching The Stepford Wives on my laptop in the kitchen (which is my new favorite thing).....what I ended up with is the perfect seasonal treat!  I still cannot believe how rich, creamy and delicious this ice cream is.  And then Ryan bought Mrs. Richards Hot Fudge at the grocery store.  Holy cow.  The combination of the two is pure magic.  It is great as a nighttime indulgence, but would also be excellent to bring to a picnic or barbeque.  I think I am going to make another batch for 4th of July.  Enjoy!  <3 Carrie

{peach ice cream} with hot fudge
Homemade Peach Ice Cream

Ingredients:
  • 3 eggs, beaten
  • 1 3/4 cups white sugar
  •  4 fresh peaches, pitted and chopped
  •  2 cups heavy cream
  •  1 cups half-and-half cream
  •  1 teaspoons vanilla extract
  •  1/2 teaspoon salt

Directions:

  1. In a large bowl, mix together eggs and sugar until smooth; puree peaches in food processor until all chunks are gone and the texture is smooth.  Stir 2 1/2 to 3 cups of puree into egg mixture. Stir in cream, half-and-half, vanilla and salt and mix well.
  2. Pour mixture into freezer canister of ice cream maker and freeze according to manufacturer's instructions.  My ice cream maker would only hold about 2/3 of the mixture, so I had to do two batches.  After the ice cream maker is finished with each batch, transfer the ice cream into a freezer safe storage container and place in the freezer.  Mine took 30 to 40 minutes per batch, and then the ice cream took about 2 hours to set up completly in the freezer.
*This recipe contains raw eggs. It is recommended that pregnant women, young children, the elderly and the infirm do not consume raw eggs.

Wednesday, June 27, 2012

{the summer wishes} mini

{the summer wishes} mini
To help make my summer wishlist a reality I decided to create a minibook to hold all my wishes. 
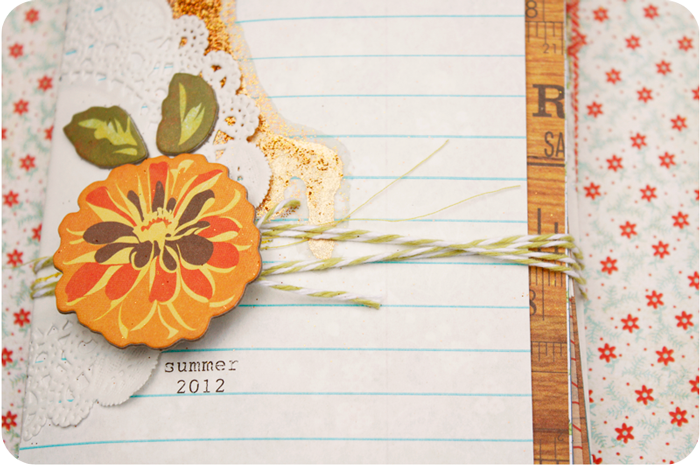
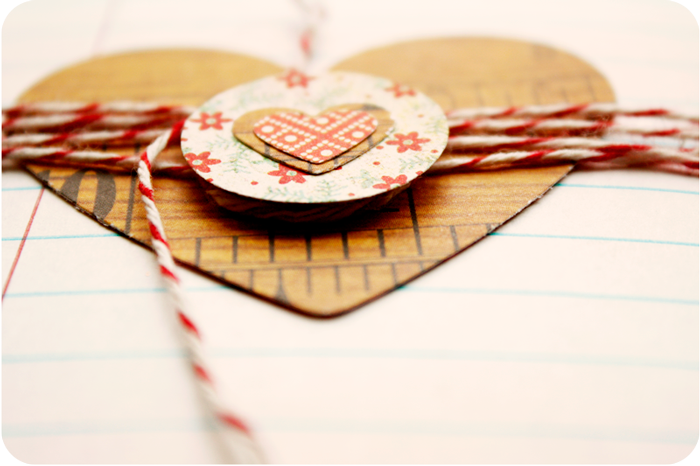
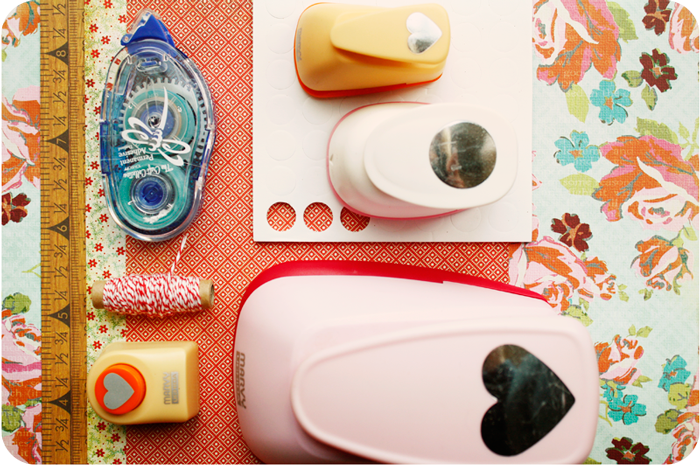
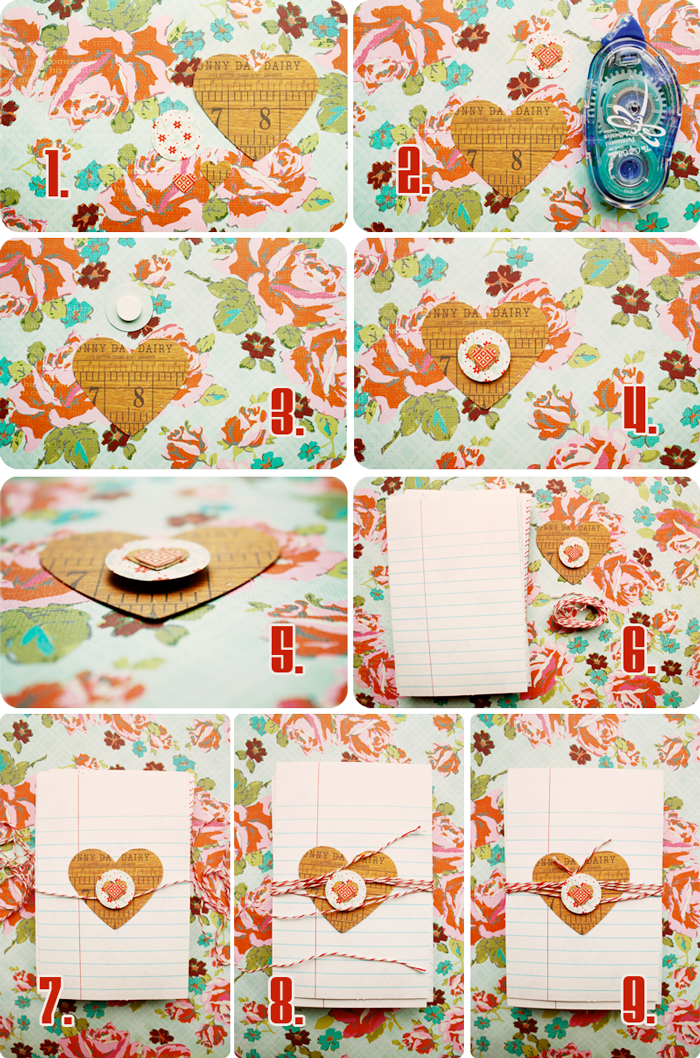
Yesterday's DIY was the inspiration for binding it all together, using a chipboard flower mounted on a foam pop-up circle as the enclosure to wrap the ends of my bakers twine.

{wishes} all wrapped up

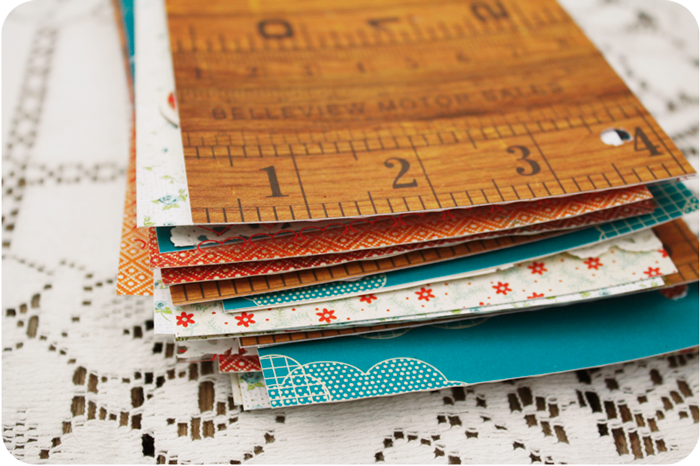
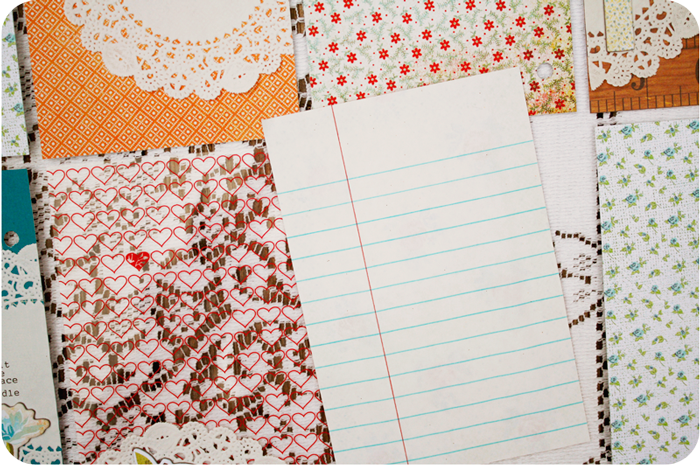
Each of the pages are loose and stacked inside the cover which is two pieces of 4x6 inch paper held together at the spine with a doily.

{inside} the cover stack {inside} the cover
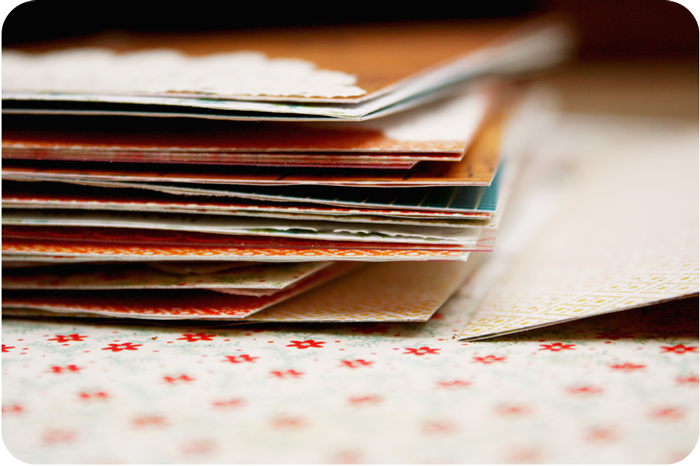
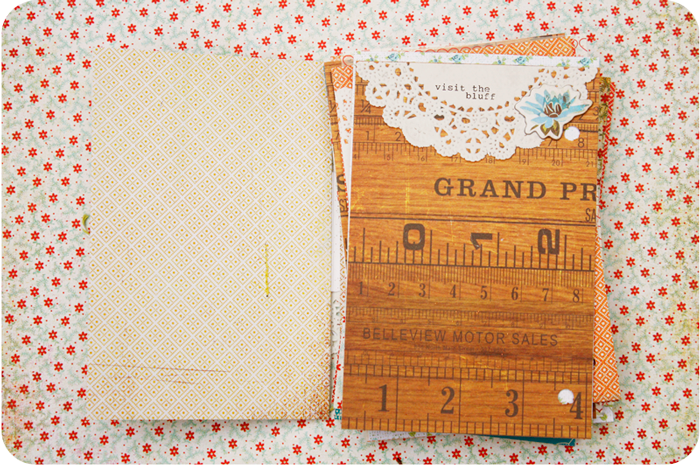
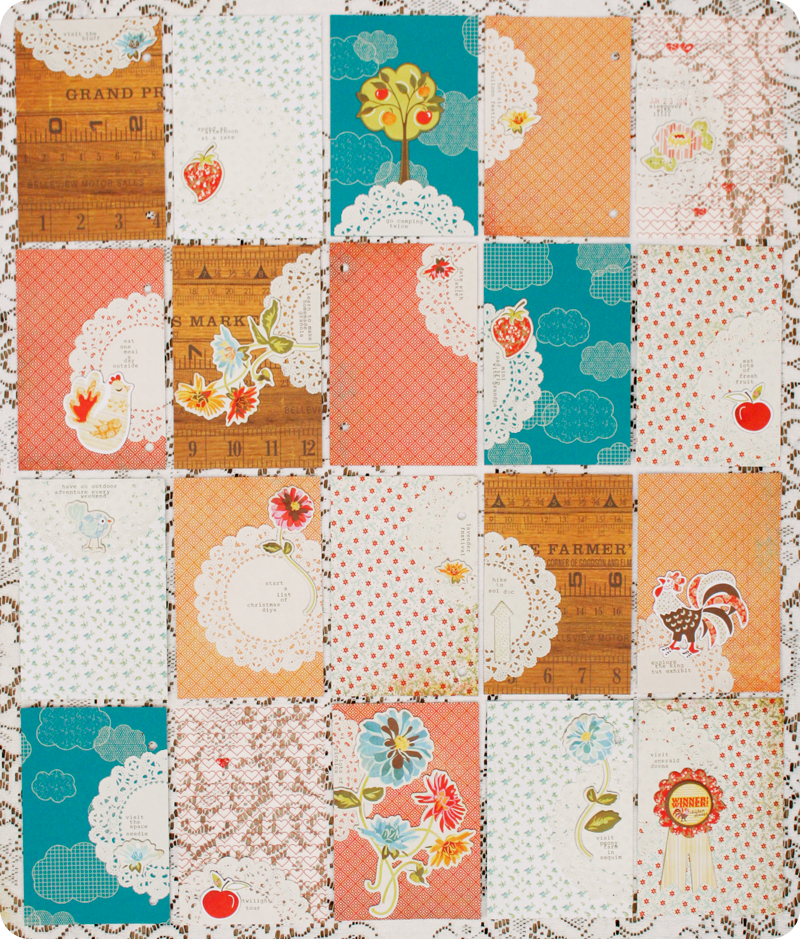
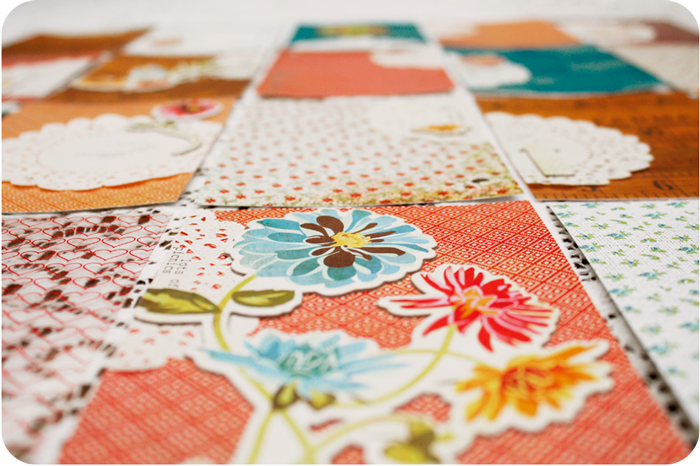
Each wish is typed onto a piece of doily (i used my typewriter) and has it's own 4x6 page. I have 21 wishes total, and below are 20 of them (you can click on the image to see it larger if Flickr).

{tracking} my summer wishes {wish} lots of picnics
The backside of each page is a piece of notebook paper for adding memorabilia, photos, notes, etc..... The plan is, once I complete a wish, to mark it with a date stamp.  Origianlly, I was going to add the date on the back, but now I think I may add each one directly to it's doily (like in the example after the photo below).

{backside} of pages
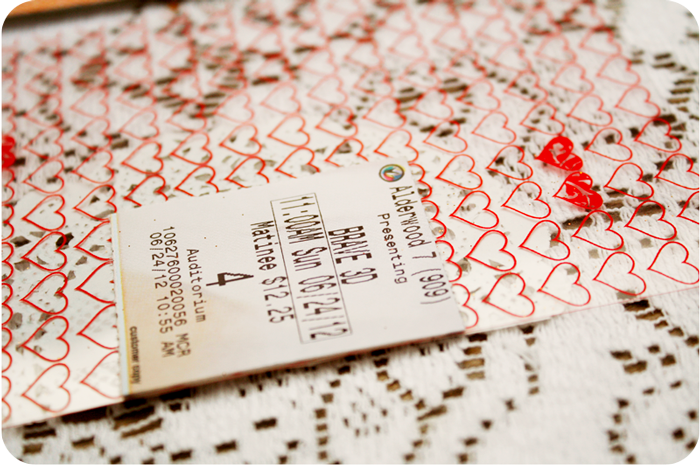
Three of the 21 wishes are mounted on a piece of Hambly Transparency. The page below is a completed wish with the completion date stamped above the text and a movie stub adhered to the back (we went to a great movie the morning after our sleepover!) I have notes to add to this page (like memories of staying up late with my kid sister, watching you tube videos so we could learn how to speak with an Irish accent : ) and am still deciding how to do this with the transparency.

{completed} wish {memorabilia} from wish
It's going to be fun watching this book grow.  All in all, I am pretty excited about using this little gem of a mini as I track all the lovely things I hope to enjoy this summer. <3 Carrie

{wishes} front cover {stack} of pages {first} wish

Monday, June 25, 2012

{diy} heart enclosure

{diy} heart enclosure
The other day I shared a stack of Father's Day cards wrapped up in baker's twine. Today I thought it would be fun to show my easy method for holding the twine together without any knots. You basically just wrap it around the middle of two hearts layered together.....

{heart enclosure} {supplies} heart enclosure
The supplies I used:
  • Three different patterned papers
  • 1 large heart punch
  • 1 small heart punch
  • 1 x-small heart punch
  • 1 small circle punch
  • Bakers Twine
  • 1 large pop-up foam circle
  • Tape Runner (or your favorite paper adhesive)

{instructions} heart enclosure
  1. Punch out 1 large heart, 1 small circle, and 1 extra small heart, all with different patterned papers.  Then punch out the small heart in the same paper as the large.
  2. Use your tape runner (or favorite paper adhesive) to adhere the small circle, small heart, and extra small heart layered together.
  3. Attach the pop-up foam circle to the underside of these layered circle and hearts.
  4. Sandwich with the large heart.
  5. You can see where there now is space to wrap the bakers twine in between the layers (and around the pop-up foam circle).
  6. Grap your papers to wrap up, the bakers twine, and heart enclosure.
  7. Find the center of the bakers twine and place in-between the open layers of the heart enclosure.
  8. Wrap the bakers twine around your papers  (alternating around the right and left sides of the heart enclosure) until there are only a few inches of twine left on each end.
  9. Taking one end at a time, wrap the excess around the foam pop-up circle (and in-between the open layers of the heart enclosure) until there is only a little twine left on each end.  All done.
This technique can apply to all sorts of objects layered together.  I hope you have fun with it.  Tomorrow I have a small project to share (using this DIY as inspiration) that will help me track my summer fun as I check things off my Summer Wishlist.  See ya!  <3 Carrie

{my summer} wishlist

{my summer} wishlist
I have been thinking about this for months....how am I going to take advantage of my first full summer in Washington? Here is what I've come up with:

  • An outdoor adventure every weekend
  • Eat lots of fresh fruit
  • One meal outside everyday
  • Hot Air Balloon Festival (on my birthday weekend)
  • Camping twice
  • Sleepover with my kid sister
  • Start a list of DIY Christmas gift ideas
  • Hike to Sul Duc Falls (maybe soak in the natural sulfur bath)
  • Lots of picnics (even indoors)
  • Visit the Bluff
  • At least one outdoor photoshoot (design & shoot)
  • Lavender Festival
  • Date with my kid brother
  • Twilight Tour (Forks & Quileute Reservation & La Push)
  • Spend an afternoon at a lake
  • Learn to make homemade granola
  • Visit the Peony Farm in Sequim
  • Mini road trip with my grandpa
  • Visit the Space Needle
  • Explore the King Tut Exhibit at Seattle Pacific Science Center
  • Visit Emerald Downs

What plans do you have for the summer?  <3 Carrie

Friday, June 22, 2012

{weekend adventure} tiger mountain

{Paragliders} {looking up} {colorful} trail {shaggy} moss {group} pic {summer} grass {reached the top} {tree greenery} {a cool drink} {ryan} watching {puffy} clouds {toy camera} photo
{getting ready} to jump
{in love} {happy ferns} {hike through the forest}
Since the weekend is upon us yet again I thought I'd share photos from one of our past weekend adventures here in Seattle (in case you were looking for something fun in the area). This was Ryan and my first hike since moving here. We had no idea that it would be as amazing (and challenging) as it was. The 2 mile hike up the mountain was up hill (which Ryan and I are generally not a fan of), but beautifully covered in a canopy of bright green trees, surrounded by tall ferns and other woodsy things. There were two areas at the top where we stopped to lounge on the mountain slope and watch the paragliders jump off. Most of the photos of people I either took from the side or behind because I was the slowest up the mountain (I blame the photo taking ;), and once at the top was not a fan of turning my backside toward the open mountain edge. I had never before experienced the constant line of people waiting up to jump off a mountain before. It was crazy cool. And the view. Breathtaking.  We went with Ryan's cousin, his cousin's girlfriend (that's a photo of them hugging), and her good friend.  Such a wonderful afternoon. <3 Carrie

Thursday, June 21, 2012

{the perfect} parfait

{yogurt} ricotta parfait
For my lovely mother's birthday last month I decided to try out Giada's Ricotta Parfait Recipe for breakfast before a morning of garage sailing.  It was a big hit, and since then I've tried all sorts of variations on her recipe.  Here's a look at one that I love.....

{layers} of delicious {fresh} berries {eat me}
 Yogurt Ricotta Parfaits (by Giada De Laurentiis)

Ingredients:
  • 1 cup ricotta cheese
  • 1/2 cup plain yogurt
  • 1/2 cup raspberry jam, divided
  • 2 cups granola, divided
  • 1/2 cup sliced almonds, toasted*

Directions:

In a small bowl, whisk the ricotta cheese and yogurt together until smooth. In each parfait glass, layer 2 tablespoons of the ricotta mixture, 1 tablespoon raspberry jam and 1/4 cup of granola. Repeat the layers. Spread the remaining ricotta mixture on top and garnish with toasted almonds before serving.

*Cook's Note: To toast the sliced almonds, arrange them in a single layer on a baking sheet. Bake in a preheated 350 degrees F oven for 6 to 8 minutes until lightly golden. Cool completely before using.

My Notes:

I've noticed that the ricotta texture is more or less course depending on the brand you use.  Precious Part Skim Ricotta was more course, and Frigo Part Skim Ricotta was less course.  Also, I've only tried this recipe with vanilla or strawberry & honey flavored yogurts, not plain.  The Lucerne Vanilla is inexpensive and good, but right now my favorite is the Greek Gods Yogurt!  Every flavor I've had of theirs I've loved.  Another alternative is right now I prefer fresh berries to the raspberry jam.....however, the raspberry jam is excellent in it!  I also highly recommend adding lots of toasted almond slices.  The nuttiness brings all the flavors together.

I am in the process of learning to make the perfect homemade granola, and still haven't mastered it yet.  Will share that recipe once I have.  I hope you enjoy this lovely summer breakfast as much as I do!  <3 Carrie